Crochet an easy Slipper

Hey creative souls! I hope this post finds you in a good time. First of all I apologize for not updating any pattern for a very long time. I won’t be making any excuses for that. But hey, I’m back and this time I have this super gorgeous pattern to share with you all. Here’s a very easy to crochet slippers. I’m so excited to share this pattern with you all after a long break of not posting on my blog. Thank you for bearing with me.

I’ve always wanted to make slippers and boots that I can actually wear outside. Because as you know, most of the crochet or knitted slippers are for inside the house. So when I discover this I was beyond happy. It got me all pumped up with energy and I was so ready to work on it. Then I went ahead with it. Had to frog 3 times before I finally found the best and easiest way to do it. As always, I try to simplify every pattern to the simplest possible way while maintaining its beauty.


Under $1.00 supplies:

My sister was the inspiration for this project. She knows basic crochet and she still made a beautiful slipper out of it. So I asked her about the yarn she used and where could I get such sole. She then led me to a big time cobbler or sole shop, I don’t know the term for such shops. They were selling it in huge quantity. So I bought just 3 sizes, India/UK size 5, 6, 7 for trial. Each pair cost me only 60 rupees ($ 0.82). Then we went for the yarn, later on I found out that it was a macrame yarn of about 1mm in thickness. A bundle cost me 20 rupees ($ 0.27) They were all local stores, so there isn’t any brand label on them. But they were of really great quality. If you’ve seen the video I made on this piece you’d understand. The pattern uses so less yarns that one bundle of yarn which is about 25 grams, is more than enough to make the pairs easily. And you’d still be left with yarns enough to make another smaller slipper. So the sole and yarn put together came to less than 70 rupees/$ 1.00

You can find it in your locality too. And the good thing is they’d put the first base stitches for you if you ask them. Or better yet, if you have the tools you can make it yourself at your pace.

Alright, enough with my stories. Off we go to the pattern. Enjoy!

Crochet Easy Slippers (Unisex)

 Designed by Kinjinlu Khumba

 Level: Beginners – Intermediate

 #KK-Cr-Slipper-001

You can find the ad free Instant Printable Download PDF  from here, in case you’re looking for one. And also I’ll be really grateful if you would kindly purchase this pattern as it will help me maintain this website and would be a huge booster and an encouragement for the efforts I’m putting in. Your support means so much to me. Even if you don’t purchase I’m still so grateful that you took the time to read my pattern and visited this site. Enjoy the free pattern!

Here are some great sets for beginners. Its also great for anyone who’s looking to get a complete set. Personally, I feel that its better to get the whole set rather than buying one hook at a time. Anyway, click on the link for more details. It’s an affiliate link and if you happen to make a purchase I get a small commission, at no extra cost to you.

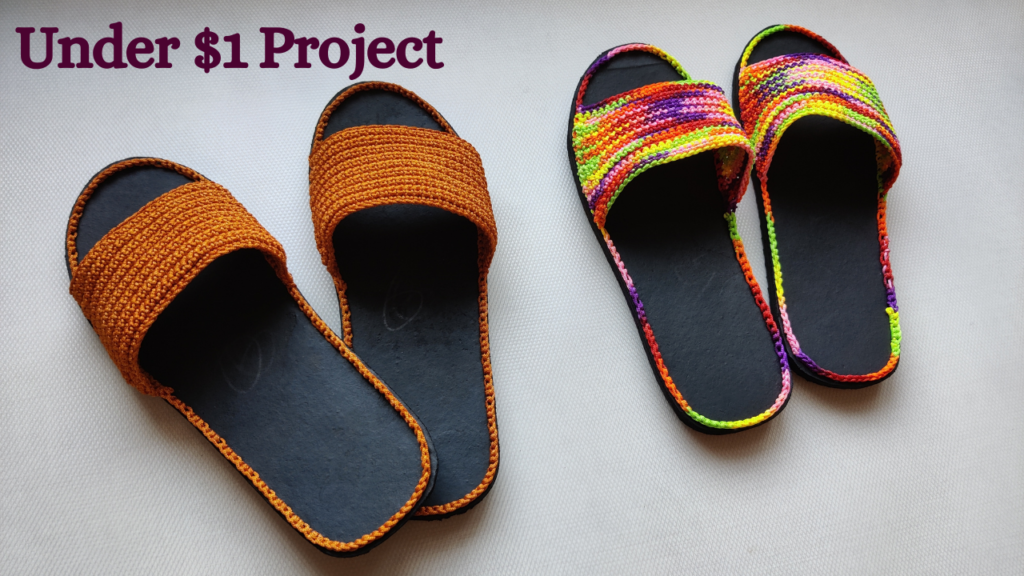
As for the yarn in this project, you’ll need a 1mm macrame yarns. You do not want to get the ones with wax. That’ll be too stiff and won’t be able to crochet as a yarn. So you can check this out here. Click on the image for more details. 

Materials:
1)      1.75 mm crochet hook
2)      Yarn: Macrame yarn – 1mm thickness (color and brand of your choice) 65 yards
3)      Sole with base stitches
4)      Scissors/thread cutter
5)      Measuring tape or inches scale


Abbreviations: (US Terminology)
1)      R= Row
2)      sc= single crochet
3)      dec =  decrease, sc 2 st together (make invisible decrease)
4)      Slp = slip
5)      St = stitch
6)      Ch = Chain
Gauge:  8rows 7sc = 1” Square

Measurements and Sizes: Adjustable as per different sole/slipper size. The written instruction here is for India/UK shoe size. (no. 6)

Note:


Before you begin the foundation SC, you’ll need to identify the point from where you should begin your SC. Here are 2 ways you can use to identify the starting point. 


Method 1: Divide it into half

Divide the sole into 2 equal halves. On the upper half move up the measurement by a few centimeters and mark the stitch. You can begin the foundation SC from there and crochet all around.


Method 2: Follow the Curve

If you follow the curve of the sole you can mark your beginning stitch at the point where the curve ends. After that it’ll be more of a straight line towards the heel area. It’s not difficult to identify the curve point. 

Pattern: (Number 6)

Foundation:

Make sure that you insert your hook from outside towards the inside as shown in the picture.  

You could insert from any direction but the border looks better when done through the way that’s shown in the picture.

Start with the right side of the slipper.

 Put 3 SC into each of the base stitch. If the stitch is short, you may put only 2sc. It’s not a fixed number. Put SC all around.

Slp st to the first SC and get ready for the next step. 

Body:

After slip st Ch 38 & join it with a slp st to the base on the other side of the slipper in a straight line.

Repeated Corner stitch: Join the row  with slp st to the foundation/base on the other side of the slipper.SC on the next base st, turn.

There will be 2 stitches which can be confusing in the beginning of every row.

1. A SC st on the base getting ready for the next row. It’s like chaining 1 to start a new row. So it does not count as a st.

2. A fake st due to the slip stitch made while joining the previous row with the foundation or border. So you need to skip the fake stitch too. 

Row 1-2: 38 SC

Row 3: 1 SC, dec, 32 SC, dec, 1 SC.

Row 4-5: 36 SC

Row 6: 1 SC, dec, 30 SC, dec, 1 SC

Row 7-8: 34 SC

Row 9: 1SC, dec, 28 SC, dec, 1SC

Row 10-11: 32 SC

Row 12: 1Sc, dec, 26 SC, dec, 1SC

Row13-14: 30 SC

Row 15: 1SC, dec , 24 SC, dec, 1SC

Row 16-17: 28 SC, slp st to join with the base. Ch1 to secure and cut off the yarn.


Hide the extra tail on the inner side of the slipper. And it’s done. 

Left Side:

Just keep both the slippers together and mark the beginning stitch. This way you don’t have to take the measurements all over again.


Repeat the same steps of construction for the left slipper as the right slipper.


N.B: For bigger slipper you can keep going with the 3 row repeat until you get your desired width for the belt. 

And if you don’t want to count the number of chains or have a different shoe size you can do this and it’ll work for any size.

Width of the slipper +extra thumb length (~5cm)

And that’s all. You’ve learnt to make this slipper easily. If you need here’s the link to the visual tutorial too 

Well that’s all for this pattern. And it’s optional but if you want the size charts and want to know how much to chain for different sizes, it is available on the Instant Printable Download. Please get it from the link provided above (in the beginning)

So what do you think? Its the basic of a slip on slippers where you just had to make the belt that runs over your feet. The width is also adjustable. Make it as big or as small as you want. What I’ve given is just an approximation and general size and you can always tweak around to your liking. I believe it was easy for you too. I had a lot of fun creating this pattern. I’ll also come up with different styles and pattern from this very sole type. I really like it. From my experience they are quite sturdy and and last a long time. Beautiful color works will amaze you every time, so I choose vibrant colors for this project which is exactly my mood while developing this pattern. Anyway you’ll see that my projects are really colorful. Haha. 

Thank you for reading it all the way through. Have a wonderful time ahead. Take care, and bye for now. 

Copyright © 2021 Lu’s Handicrafts

This design, the written pattern and images are a copyright of Lu’s Handicrafts and may not be copied or reproduced in any way whether on paper or electronically.  You have permission to sell the finished products made from this pattern, but please leave a link to my website, www.lushandicrafts.com in your product listing specifying that Kinjinlu Khumba is the designer of this pattern. Thank you for supporting me.

 If you have any trouble with this pattern, fond errors or want to give feedback, please feel free to contact me at lushandicrafts@gmail.com. Also a visual tutorial is available on my YouTube channel, Lu’s Handicrafts, if you need further assistance. 

Leave a Comment

Your email address will not be published. Required fields are marked *