Crochet Nursery Mobile

Hi there! So Following the free pattern on “How to crochet Perfect Balls” I have come up with a beautiful idea on how to turn those cuties into a room decor. Especially for a nursery. I was inspired by the idea of felt ball room decors. Of course, it would look perfect just on any room given the space. 

It would be great for baby showers gifts, or your own nursery if you have one. One can also use it as a wind chime or just a wall decor that would greet guests in the doorway or the common room like a little chandelier. I mean you can come up with multiple number of ideas.

So the pattern or steps of construction for this amazing decor is now available on my Etsy and Ravelry store. I’ll also provide the links here so that you can go to any store directly from here.

Crochet Nursery Mobile Decor


Designed by:  Kinjinlu Khumba


Skill: Intermediate


                                                    Cr-Decor-03


Supply:

1) 2.5 mm to 3mm hook (US C2/D3)

2) 2×50 gm ball of Oswal Cashmira Acrylic Yarn in each of  A- Light Yellow, B- Grey and C- White

3) Stitch Markers

4) Scissors

5) Needle

6) Polyester soft toy fillings

Abbreviations: (US terminology)

1) sc – single crochet

2) slp st – slip stitch

3) ch – chain

4) R – row

5) inc – increase

6) sc2tog – single crochet 2 together

Measurements & Sizes: These are the measurements of all that will be needed during construction of the mobile.

  • Length of twigs = 14 inches
  • Diameter of the finished crochet balls =2.5 inches
  • Length of the longer balls string, from the point of attachment = 20 inches
  • Length of the shorter balls string, from the point of attachment = 15 inches
  • Length of the center balls string, from the point of attachment = 12.5 inches
  • Length of the beads string, from the point of attachment = 26 inches
  • Distance between 2 knots in beads string = 6.5 inches

Good to know:

  • Yarn quantities are based on average requirements and are therefore approximate

Instructions are written using US terminology

Making crochet balls: The first step is to make these perfect balls. And the rest will be easily done!

Pattern:


R1: 6 sc into magic ring

R2: 2sc inc – all around

R3: 1sc, 2sc inc – all around

R4: 2 sc, 2sc inc – all around

R5: 3 sc, 2sc inc – all around

R6: 4 sc, 2sc inc – all around

R7: 5 sc, 2sc inc – all around

R8-16: 1sc all around

R17: 5 sc, sc2tog – all around

R18: 4 sc, sc2tog – all around

R19: 3 sc, sc2tog – all around

R20: 2 sc, sc2tog – all around

Stuff the ball with soft toy fillings

R21: 1 sc, sc2tog – all around

R22: sc2tog all around 


*sc2tog 1 more time, slp st into the next st, ch1 and cut off the yarns.

Now, thread in the yarn to the needle. Pass the needle from the centre of the ball’s bottom and come out on any other side of the body. Going into the same space from where the yarn had come off, let the needle come off on any other part of the body. Repeat this till the remaining tail is hidden. (Basically, just hiding the extra tail inside the body)

  • Crochet 5 ball each of Light yellow, Grey and White (total = 15 balls)

Part 2: Making The Mobile

This is the part where you assemble all the materials and put them together. Follow the step by step construction to produce a beautiful nursery mobile.

Supply:

  • 2 twigs or sticks of equal size in length and thickness.
  • Fabric glue
  • Nail
  • Hammer
  • Measuring tape
  • Beads
  • Super fine 1 ply thread or fishnet
  • Scissors
  • Small needle

Note: Let the crochet balls drop down at 3 different heights for better and more pleasant result. While attaching it to the arms and center of the mobile, do keep in mind to arrange them alternately. Also for the string holding all 3 crochet balls, if you wish, go ahead and crochet some long chains till the required length. Otherwise just a simple regular crochet yarn will do the work perfectly.

Step 1: Take 2 twigs of equal size. Wrap the grey yarn all over the two twigs and secure the end with glue.

Step 2: Now place them in an “X” position; fix the position by hammering a nail in the center. Just be careful not to cut the yarn while placing the sharp tip of the nail. Now it is secured. 

Step 3: Now it is time to assemble all the balls and thread them together for the hanging piece. Using yellow color yarn as the rope to thread in the balls, cut the yarn at about 25 inches. Make multiple numbers of knots at the end of a rope to create one big knot. Thread the yarn in to the tapestry needle. Now pass the needle through the centre of the ball, pull the yarn all the way until the knot is inside the ball. The knot will get caught among the soft filling inside the ball, so the ball will keep hanging through without falling off.


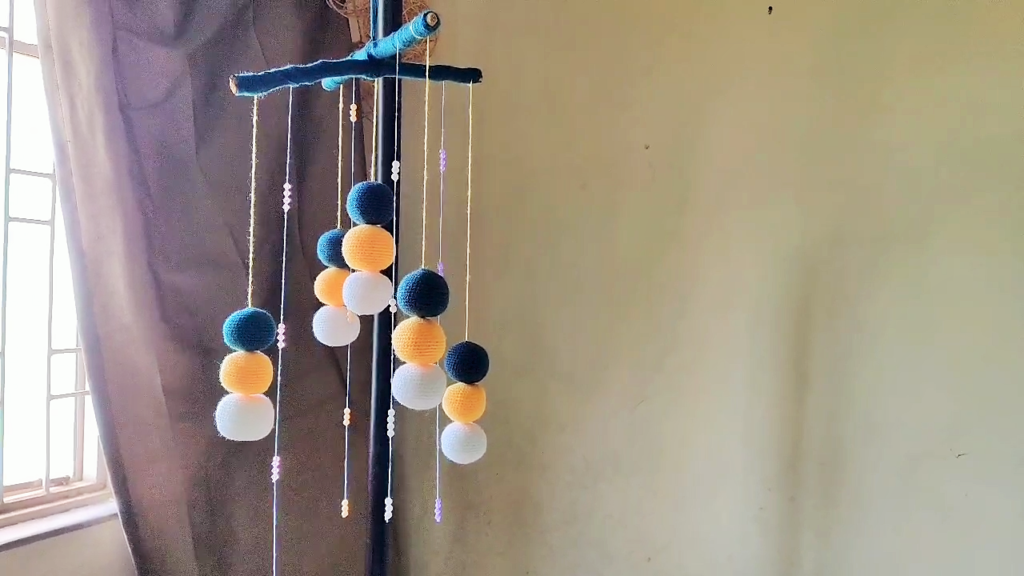
Step 4: Thread them in this color sequence: White at the bottom, yellow in the middle and grey on top. 


Make 5 of these. They shall be joined with the 4 arms of the twigs and 1 in the center.


Step 5: Use a super fine white thread to thread the beads in. You can also use transparent fish-net which are used in making jewelry and other DIYs. Use any bead color of your choice that would complement with the color of the crochet balls. I’ve used pink, purple, white and beige beads.

  • If you’re using thread, use 2 strands so that it’d be stronger and put lesser effort in making the knots.
  • Length of the beads string from the point of attachment is about 26 inches. So add extra long tail to tie around the twigs later.
  • Separate the beads with knots (4 to 5 knots along the string) as you thread the beads in.
  • Distance between 2 knots is 6.5 inches. (Doesn’t have to be exact)
  • Place 3 to 4 beads above each knot.
  • Make a few inches shorter for one or two other strings. Make 4 strings.
         

(This beads part is an addition, so don’t make them if you don’t want to. Or you can also add your own style of beading and modify as per your preference)

Step 6: Tie the 4 string of crochet balls to the far end of the 4 arms. Alternate and tie the long strings and shorter strings. Then tie the shortest one in the center.

  • Also tie the string of the beads just a few centimeters apart on the 4 arms.
  • Then finally, smoothen out the color difference at the points of attachment by wrapping another layer of grey yarn. Secure them with glue.
  • Take 2 strands of the grey yarn, secure the center firmly by wrapping around them from side to side. Double knot on top and make the loop.
 

It is very important that you tie the center firmly. This will keep the hands together and also hide all the odd extra yarns or nail, making the project look smoother. Now once this is all done, gently lift it up and see if there’s anything more you need to fix. Try hanging it on a hook and test out the balance. Fix whatever needs fixing. Then set it up and that is it.

Its so simple yet so captivating. I couldn’t believe that something so beautiful, peaceful and full of positivity could be made out of something really simple. But anyway, crochet balls when modified can be made into adorable amigurumis.  Here, check out some of my pictures where I placed it, because I really don’t have a nursery yet. 

I had a lot of fun making these. I’m also planning to make different versions of these. If you have great ideas about these, please feel free to share it with me in the comments.

You might also want to check out other posts, like how to crochet these perfect balls. 

 Copyright © 2021 Lu’s Handicrafts     

This design, the written pattern and images are a copyright of Lu’s Handicrafts and may not be copied or reproduced in any way whether on paper or electronically.  You have permission to sell the finished products made from this pattern, but please leave a link to my website, www.lushandicrafts.com, in your product listing specifying that Kinjinlu Khumba is the designer of this pattern. Thank you for supporting me.


If you have any trouble with this pattern, find errors or want to give feedback, please feel free to contact me at lushandicrafts@gmail.com. Also a visual tutorial is available on my YouTube channel, Lu’s Handicrafts, if you need further assistance.

Leave a Comment

Your email address will not be published. Required fields are marked *